Contents
Manufacturing Insight: Steel Strength Chart

Steel Strength Reference Guide Introduction
Understanding the mechanical properties of steel alloys is fundamental to achieving optimal performance in precision-engineered components. At Honyo Prototype, our CNC machining services leverage this critical knowledge to ensure every part meets stringent functional and durability requirements. This steel strength chart provides essential tensile yield and ultimate strength data across common grades, enabling informed material selection for applications demanding high load resistance, fatigue endurance, and dimensional stability.
Honyo’s end-to-end CNC machining capabilities—from multi-axis milling and turning to complex Swiss machining—are engineered to transform these material properties into real-world solutions. We specialize in tight-tolerance production (±0.0002″) for aerospace, medical, and industrial sectors, utilizing advanced HAAS and DMG MORI equipment alongside rigorous in-process quality validation. Our expertise ensures steel alloys are machined to maximize inherent strength while minimizing residual stress, directly impacting part longevity and reliability.
Leverage this reference to align your design specifications with achievable manufacturing outcomes. For immediate project assessment, utilize Honyo’s Online Instant Quote platform. Input your steel grade, geometry, and volume requirements to receive a detailed manufacturability analysis and competitive pricing within hours—accelerating your path from prototype to production.
Key Steel Properties Overview
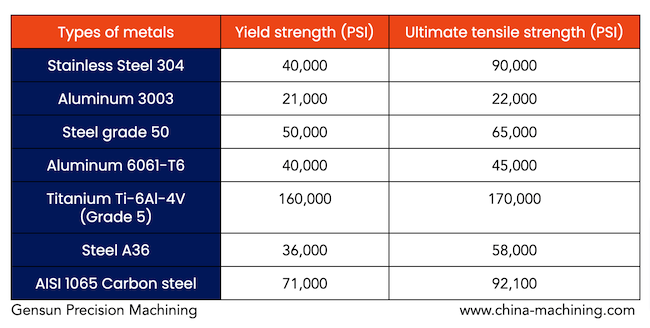
| Steel Grade | Tensile Yield Strength (MPa) | Ultimate Tensile Strength (MPa) | Common Applications |
|——————-|——————————|———————————|——————————|
| AISI 1045 | 360 | 560 | Shafts, Axles, Gears |
| AISI 4140 | 655 | 850 | Tooling, Aircraft Components |
| AISI 4340 | 745 | 930 | High-Stress Structural Parts |
| AISI 304 Stainless| 215 | 505 | Corrosive Environment Parts |
Technical Capabilities

Technical Specifications for Steel Strength Chart in Precision Machining Applications
The following table outlines key mechanical properties relevant to common materials used in 3-axis, 4-axis, and 5-axis CNC milling and turning operations, particularly in applications requiring tight tolerances (±0.0005″ to ±0.005″). These values support material selection and toolpath optimization for high-precision manufacturing at Honyo Prototype.
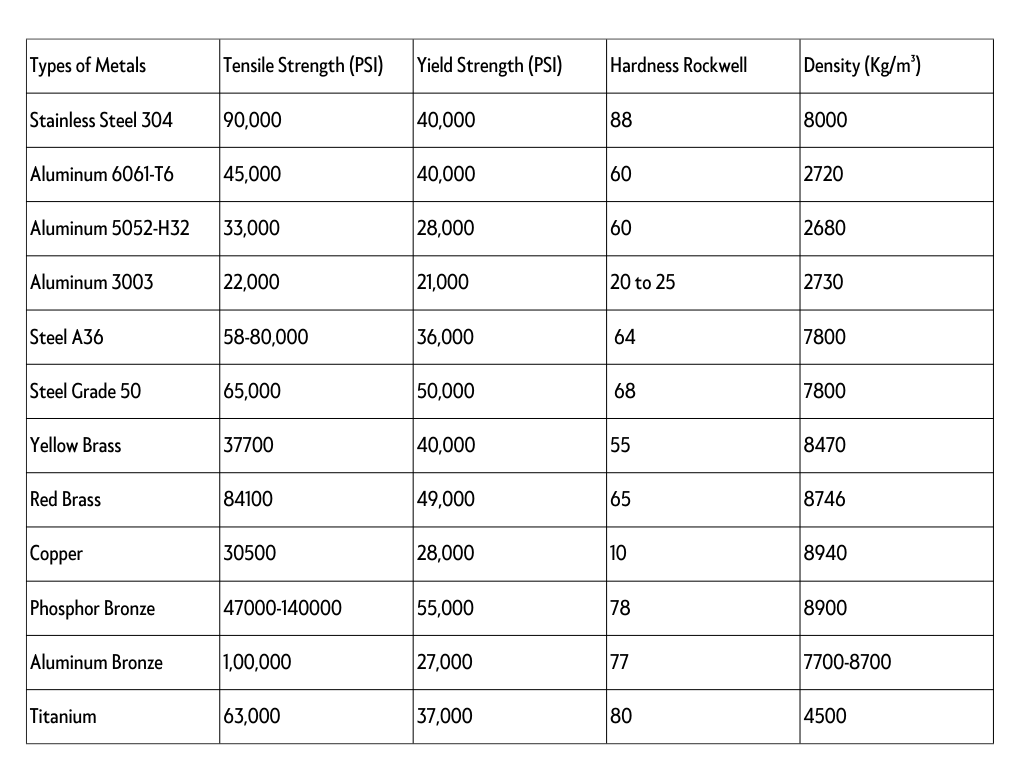
| Material | Tensile Strength (Ultimate) | Yield Strength | Hardness (Brinell or Rockwell) | Machinability Rating (%) | Typical Applications in Precision Machining |
|---|---|---|---|---|---|
| Aluminum 6061-T6 | 45,000 psi (310 MPa) | 40,000 psi (276 MPa) | 95 HB / 60 HRB | 90% | Aerospace components, enclosures, heat sinks |
| Aluminum 7075-T6 | 83,000 psi (572 MPa) | 73,000 psi (503 MPa) | 150 HB / 75 HRB | 70% | High-stress structural parts, defense, racing |
| Mild Steel (A36) | 58,000–80,000 psi (400–550 MPa) | 36,000 psi (250 MPa) | 120 HB / 65 HRB | 55% | Jigs, fixtures, non-critical structural supports |
| Stainless Steel 304 | 75,000 psi (517 MPa) | 30,000 psi (207 MPa) | 200 HB / 90 HRB | 45% | Medical devices, food processing, corrosion-resistant parts |
| Stainless Steel 17-4 PH | 150,000 psi (1,034 MPa) | 130,000 psi (896 MPa) | 330 HB / 35 HRC | 30% | Aerospace, high-performance shafts, tooling |
| Tool Steel (D2) | 190,000 psi (1,310 MPa) | 170,000 psi (1,172 MPa) | 58 HRC | 25% | Molds, dies, wear-resistant components |
| ABS (Acrylonitrile Butadiene Styrene) | 6,500 psi (45 MPa) | 5,500 psi (38 MPa) | 85 Shore D | 100% (excellent) | Prototypes, housings, low-wear fixtures |
| Nylon 6/6 | 11,000 psi (76 MPa) | 8,500 psi (59 MPa) | 80 Shore D | 80% | Gears, bushings, insulating components |
Notes on Machining Performance:
CNC 3/4/5-axis milling of high-strength steels (e.g., 17-4 PH, D2) requires rigid setups, specialized tooling (carbide or ceramic), and conservative feed rates to maintain tight tolerances and surface finish. These materials exhibit high work-hardening rates, necessitating optimized toolpaths and coolant strategies.
Aluminum alloys are ideal for high-speed 5-axis operations due to low cutting forces and excellent thermal conductivity. They allow for aggressive material removal while maintaining dimensional stability.
Engineering plastics like ABS and Nylon are suitable for non-metallic prototypes and functional testing. They require sharp tools and proper chip evacuation to prevent melting and maintain edge definition.
Turning operations on steel demand high-pressure coolant and CBN or coated carbide inserts to sustain accuracy over long runs. Aluminum can be turned efficiently with uncoated carbide or diamond-tipped tools.
For all materials, achieving tight tolerances depends on machine calibration, thermal stability, fixturing rigidity, and in-process inspection. Material property consistency and pre-conditioning (e.g., stress relieving) are critical in precision work.
From CAD to Part: The Process

Honyo Prototype’s steel strength validation process ensures mechanical property compliance for structural steel components through an integrated digital workflow. The term “steel strength chart” refers to the certified material test reports and mechanical property documentation generated during production, not a standalone chart. This process begins with CAD upload and concludes with traceable delivery documentation.
Upload CAD
Customers submit native or neutral CAD files (STEP, IGES, Parasolid) via our secure portal. Critical steel-specific metadata must be included: material grade per ASTM/ISO standards (e.g., ASTM A36, EN 10025 S355JR), heat treatment requirements, and any client-specified mechanical property thresholds. Missing material specifications trigger an automated hold requiring engineering clarification before progression. The system validates geometric feasibility against our steel processing capabilities, including minimum bend radii and weld accessibility.
AI Quote Generation
Our AI engine cross-references the CAD geometry and material specifications against real-time databases including ASTM A6/A6M dimensional tolerances, ISO 6892-1 tensile testing standards, and mill certificate databases. The quote provides:
Material cost breakdown based on current steel commodity pricing
Predicted yield loss from nesting optimization
Preliminary lead time estimates incorporating heat treatment cycles
Critical warnings for non-compliant specifications (e.g., requesting 500 MPa yield strength for ASTM A36 which has 250 MPa minimum)
The AI flags material substitutions where equivalent grades with better availability meet the required mechanical properties.
DFM Analysis
Manufacturing engineers conduct steel-specific DFM review using AI-assisted tools:
Grain direction analysis for rolled sections to prevent transverse loading failures
Weld preparation validation per AWS D1.1 structural welding code
Stress concentration evaluation at sharp corners using FEA simulation
Machinability assessment for high-strength steels (e.g., 4140 vs 4340)
We provide actionable recommendations such as modifying fillet radii to exceed minimum ductility requirements or suggesting normalized condition for improved formability. Material traceability requirements are confirmed during this phase.
Production Execution
Steel processing follows strict material-certified workflows:
1. Material sourcing from mills with EN 10204 3.1 certification
2. Heat number traceability maintained through laser marking
3. In-process testing:
Hardness verification per ASTM E18 at critical zones
Bend testing per ASTM E290 for formed sections
Charpy impact testing when specified
4. Final heat treatment with temperature monitoring per AMS 2750
5. Dimensional inspection using CMM with GD&T analysis
The actual strength validation occurs through third-party certified test coupons processed alongside production parts. These coupons undergo tensile testing per ASTM E8/E8M to generate the official mechanical property report.
Delivery Documentation
Customers receive comprehensive traceability packages including:
Final inspection report with dimensional conformance
Material test report (MTR) showing actual yield strength, tensile strength, and elongation
Heat treatment documentation with time-temperature profiles
NDT reports (if applicable) per ASME BPVC Section V
All documentation references the specific heat number and correlates test results to the production batch. Critical strength parameters are presented in a standardized format meeting aerospace (AS9100) and automotive (IATF 16949) requirements.
Steel Mechanical Property Reference Table
| Material Grade | Min Yield Strength (MPa) | Min Tensile Strength (MPa) | Elongation (%) | Common Applications |
|—————-|————————–|—————————-|—————-|———————|
| ASTM A36 | 250 | 400-550 | 20 | Structural beams, plates |
| EN 10025 S355JR| 355 | 470-630 | 22 | Heavy machinery frames |
| AISI 4140 | 655 | 850 | 13 | High-stress shafts, gears |
| ASTM A514 Gr B | 690 | 760-895 | 16 | Crane booms, excavator arms |
This closed-loop process ensures every steel component delivers documented mechanical performance matching design requirements. The “steel strength chart” is dynamically generated from actual test data rather than theoretical values, providing customers with auditable proof of material integrity for critical applications.
Start Your Project

For detailed technical specifications and access to our comprehensive steel strength chart, contact Susan Leo at [email protected]. As a trusted manufacturing partner based in Shenzhen, Honyo Prototype delivers precision-engineered metal components with full material traceability and mechanical property documentation. Our in-house production capabilities ensure fast turnaround and strict quality control, ideal for prototyping and low-to-mid volume production. Reach out today to discuss your material requirements and receive expert support tailored to your project’s demands.
🚀 Rapid Prototyping Estimator
Estimate rough cost index based on volume.