Contents
Manufacturing Insight: Machining Surface Finish Chart

Precision Surface Finish Standards for Critical CNC Machined Components
Surface finish directly impacts functional performance, including fatigue resistance, sealing integrity, wear characteristics, and cosmetic acceptance in precision-engineered parts. Miscommunication of finish requirements often leads to costly rework, extended lead times, or field failures. At Honyo Prototype, our CNC machining services deliver rigorously controlled surface finishes across milling, turning, and multi-axis operations, consistently achieving Ra values from 0.8 μm (32 μin) down to sub-micron levels for demanding aerospace, medical, and industrial applications.
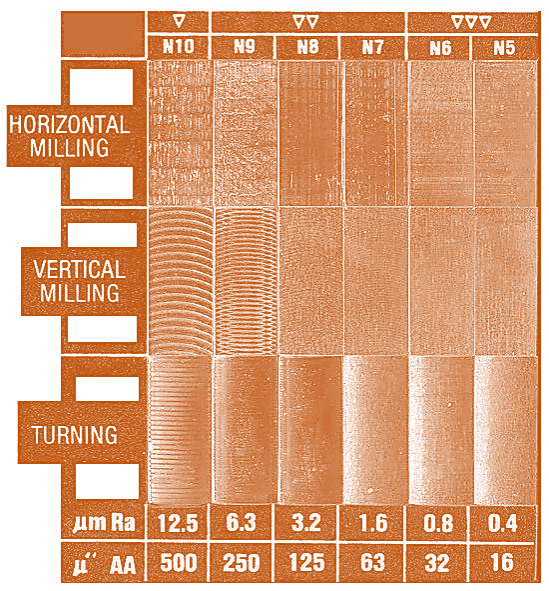
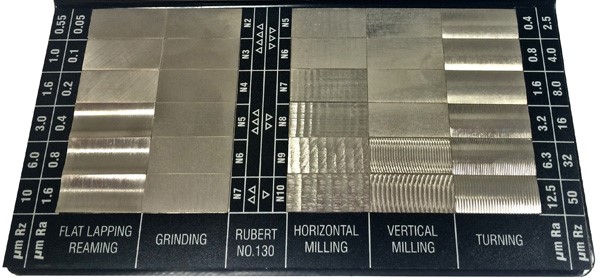
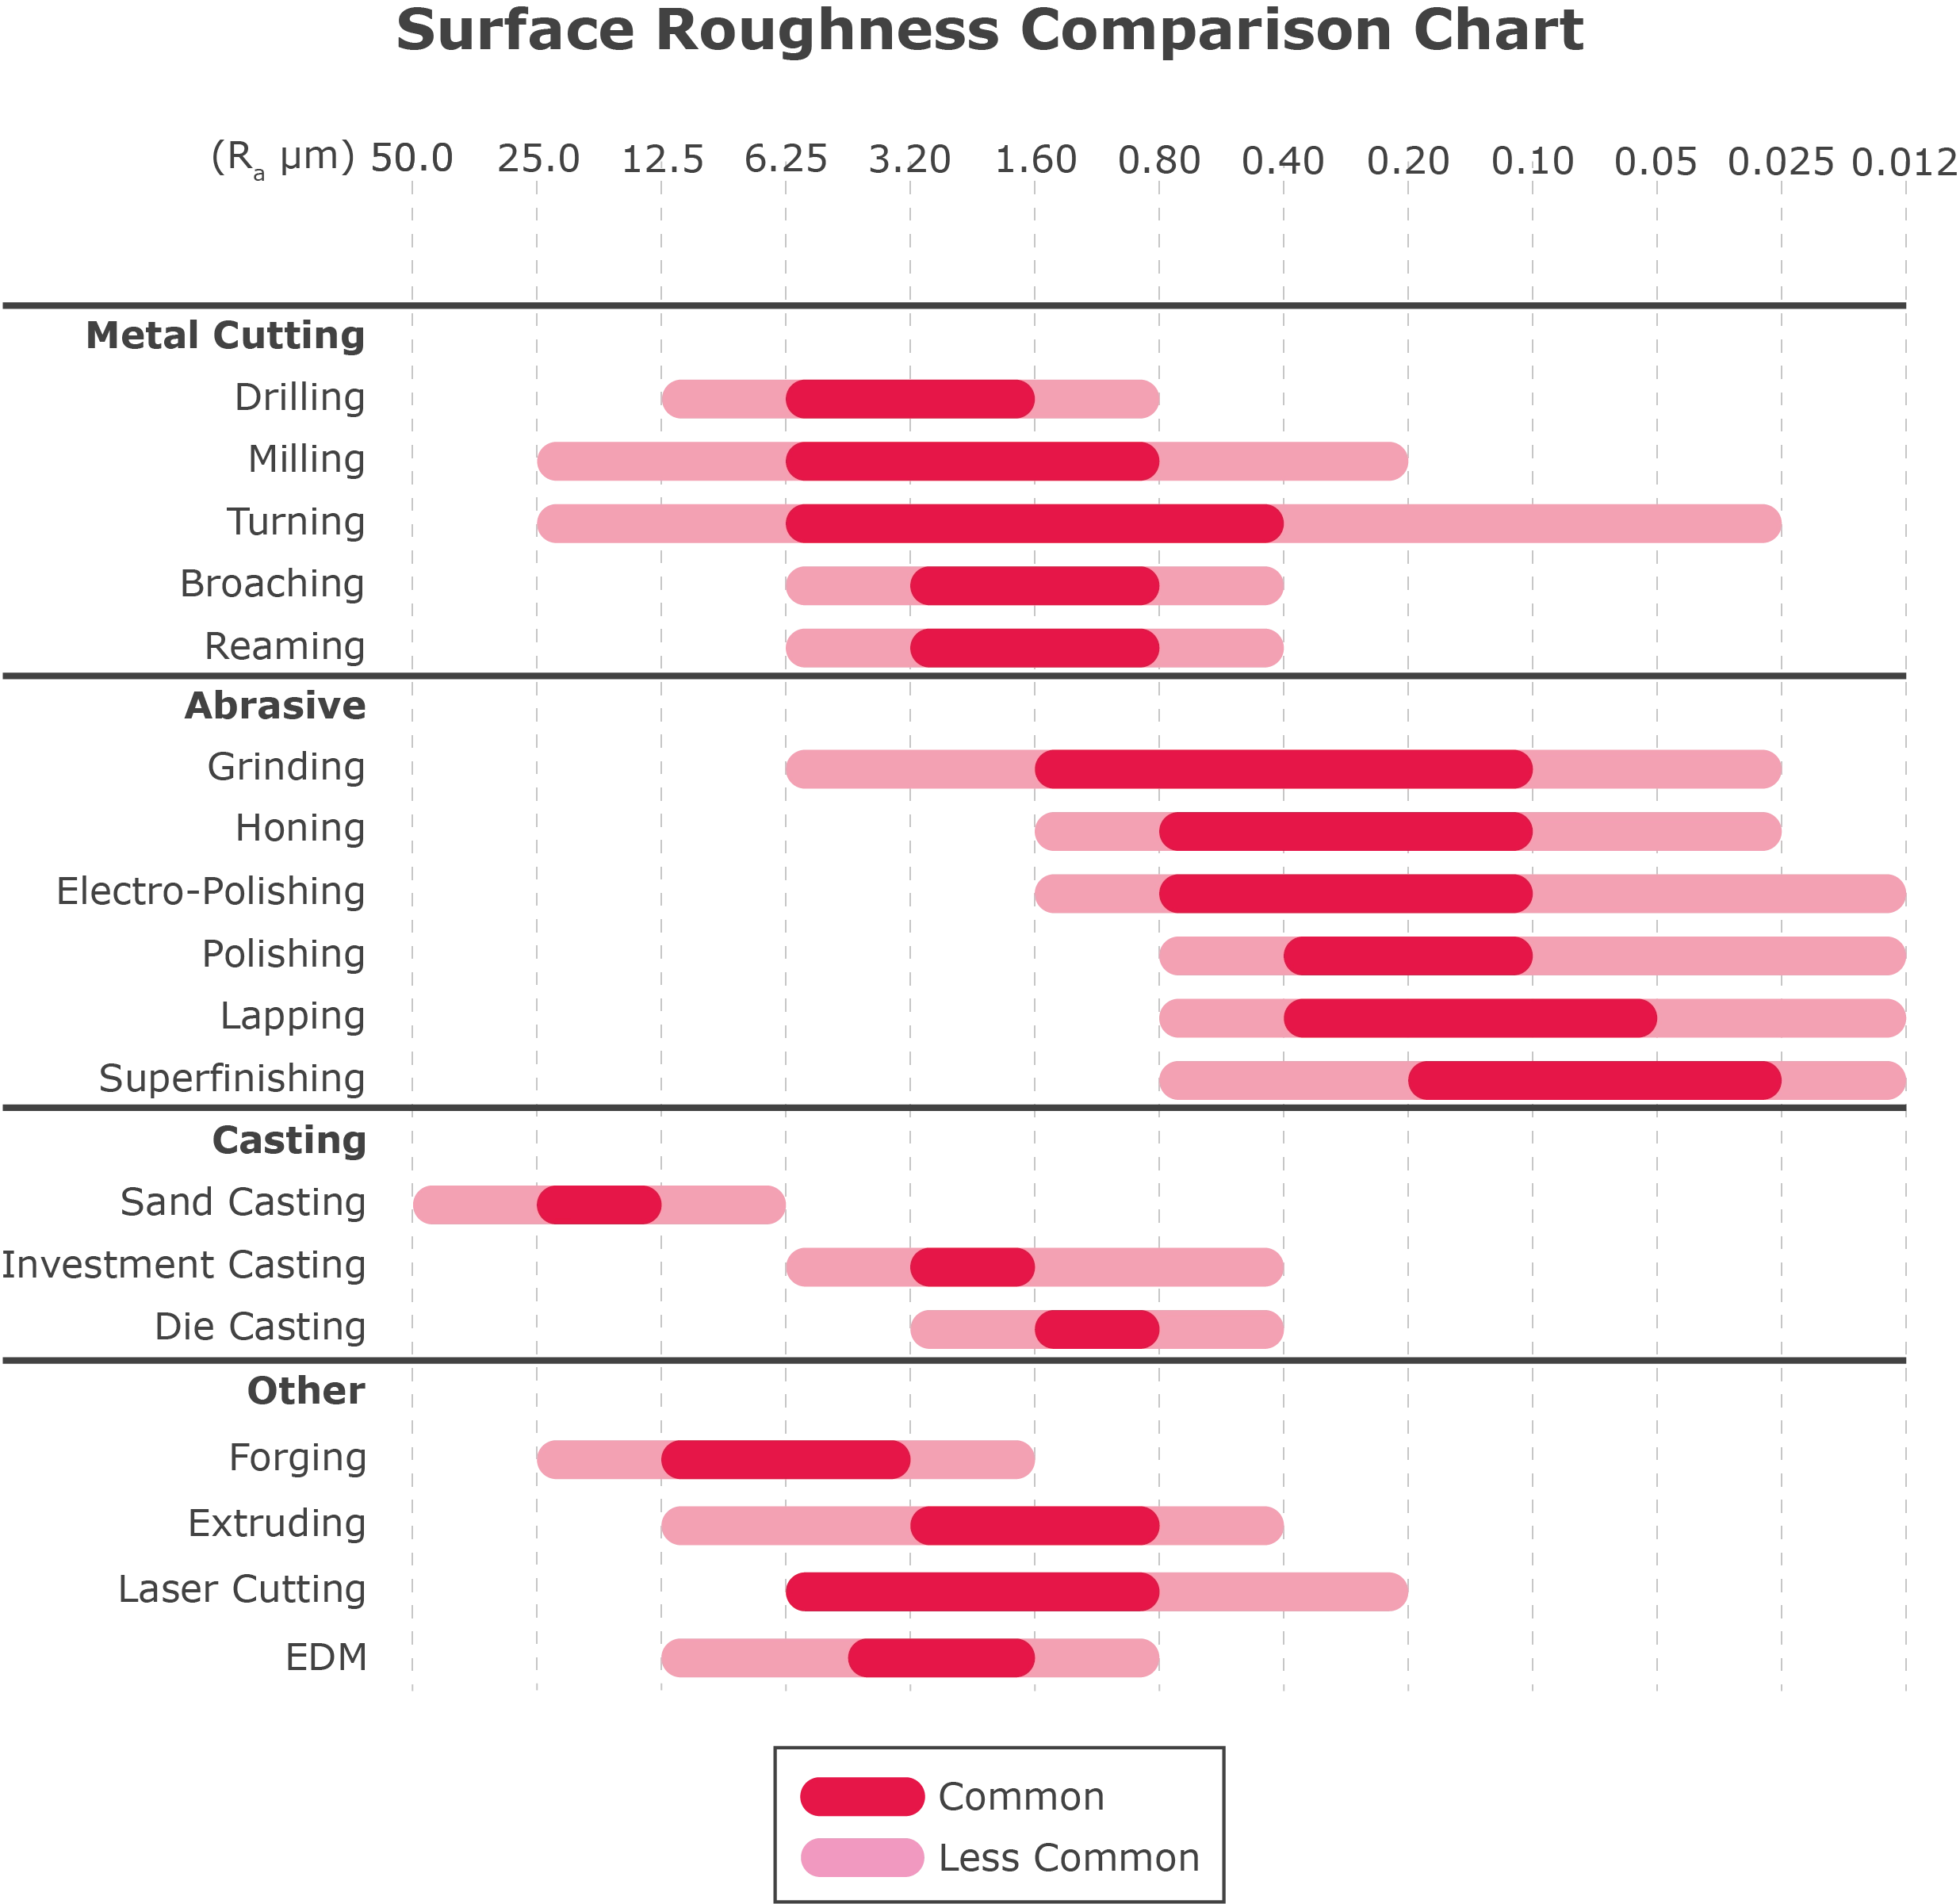
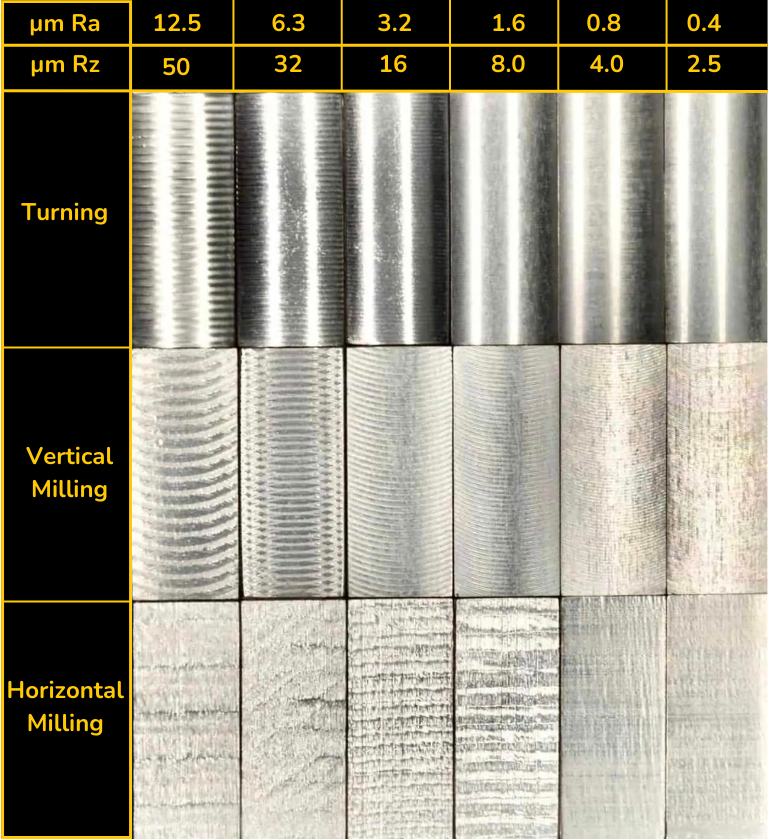
This machining surface finish chart provides an essential reference for engineers to align design specifications with achievable manufacturing outcomes. It details common finish grades, corresponding machining processes, recommended tooling strategies, and measurement methodologies to eliminate ambiguity between design intent and production capability. Honyo’s in-house metrology lab validates all surface parameters using calibrated profilometers, ensuring compliance with ISO 1302, ASME Y14.36M, and customer-specific standards.
Leverage this resource to optimize part functionality while minimizing production risk. Once your surface finish requirements are defined, transition seamlessly to prototyping or low-volume production. Honyo’s Online Instant Quote system allows you to upload CAD files, specify tolerances and finishes, and receive a detailed manufacturing assessment within hours—accelerating your path from design validation to certified component delivery.
| Key Surface Finish Parameters Supported | Typical Achievable Range (Ra) | Primary CNC Processes |
|---|---|---|
| Fine Machining | 0.8–1.6 μm (32–63 μin) | 3/5-axis milling, turning |
| Precision Machining | 0.4–0.8 μm (16–32 μin) | High-speed milling, fine turning |
| Mirror Finishing | <0.2 μm (<8 μin) | Diamond turning, specialized polishing |
Technical Capabilities

Surface finish in precision machining is a critical parameter, especially in 3-, 4-, and 5-axis milling and turning operations where tight tolerances (±0.0005″ to ±0.005″) are required. The achievable surface finish depends on machine capability, tooling, cutting parameters, workholding, and material properties. Below is a technical reference chart outlining typical surface finish ranges (Ra in microinches) for common materials processed using advanced CNC milling and turning techniques under tight tolerance conditions.
| Operation | Material | Typical Surface Finish (Ra µin) | Comments |
|---|---|---|---|
| 3/4/5-Axis Milling | Aluminum (6061, 7075) | 32 – 64 | Standard for most structural parts; can achieve 16–32 µin with high-speed finishing and polished tools |
| 3/4/5-Axis Milling | Steel (4140, 1018, 17-4 PH) | 64 – 125 | Harder steels may require slower feeds; 32 µin achievable with fine finishing passes and coated carbide tools |
| 3/4/5-Axis Milling | ABS (Thermoplastic) | 64 – 250 | Prone to melting or burring; sharp tools and optimized speeds essential; post-processing often required |
| 3/4/5-Axis Milling | Nylon (PA6, PA66) | 125 – 500 | Highly ductile; tends to deform; surface finish varies significantly with tool wear and chip evacuation |
| Turning (CNC) | Aluminum | 16 – 32 | Excellent finish achievable with diamond or CBN inserts; ideal for shafts and bushings |
| Turning (CNC) | Steel | 16 – 64 | Tight tolerance turning with wiper inserts can achieve <32 µin; depends on hardness and lubrication |
| Turning (CNC) | ABS | 125 – 250 | Requires sharp cutting edges and low feed rates; limited dimensional stability affects finish consistency |
| Turning (CNC) | Nylon | 250 – 600 | High elasticity leads to vibration and poor finish; specialized tool geometry recommended |
Notes:
Surface roughness values assume proper fixturing, high spindle accuracy (±0.0001″), and use of high-quality carbide or ceramic tooling. For tight tolerance applications, thermal stability and tool deflection control are critical. Aluminum and steel respond well to precision machining, while plastics like ABS and Nylon require customized strategies due to thermal expansion and deformation characteristics. Post-machining treatments such as polishing, anodizing, or coating may be used to improve surface quality when required.
From CAD to Part: The Process

Honyo Prototype integrates surface finish specifications systematically throughout our CNC machining workflow to ensure dimensional accuracy and functional performance align with client requirements. The process begins when a client uploads their CAD model through our secure portal. Our system automatically parses geometric annotations including surface roughness symbols per ISO 1302 or ASME Y14.36M standards. Unspecified surfaces default to our baseline machining finish per internal quality protocols.
The AI-powered quoting engine evaluates all detected surface finish requirements against material properties and geometric complexity. It flags non-conforming specifications such as requesting Ra 0.4μm on deep internal cavities where tool access is limited or incompatible finishes for specified alloys. Real-time cost and lead time adjustments occur based on these parameters before human review.
During the Design for Manufacturability (DFM) phase, our senior manufacturing engineers conduct rigorous surface finish analysis. We cross-reference client specifications against our validated machining capability matrix which correlates process parameters to achievable roughness values. Critical surfaces undergo tolerance stack-up analysis to prevent functional interference. Where client requirements exceed standard capabilities, we propose optimized alternatives with technical justification.
Honyo Prototype Surface Finish Capability Matrix for CNC Machining
| Process | Typical Ra Range (μm) | Typical Applications | Key Constraints |
|———————-|————————|———————————————–|————————————-|
| Precision Milling | 0.8 – 3.2 | Housing interfaces, rotational surfaces | Depth-to-diameter ratio > 4:1 limits finish |
| Fine Turning | 0.4 – 1.6 | Shaft diameters, sealing surfaces | Minimum feature diameter 3mm |
| Grinding | 0.1 – 0.8 | Bearing journals, hydraulic components | Non-ferrous materials limited |
| As-Machined Standard | 3.2 – 6.3 | Non-critical structural features | Default for unspecified surfaces |
In production, our CNC programmers translate approved surface specifications into machine-specific parameters. This includes spindle speed optimization, feed rate calibration, and tool path strategies such as high-speed machining for critical surfaces. Each operation undergoes first-article inspection using calibrated profilometers with traceable NIST-certified standards. Final inspection documentation includes surface roughness reports for all specified features, with 100% conformance verification against the approved DFM report.
Quality assurance protocols require surface finish validation at multiple production stages: post-roughing, semi-finishing, and final finishing. We maintain environmental controls in metrology labs to prevent thermal distortion during measurement. All finished components ship with certified inspection reports detailing Ra, Rz, and Rmax values per ASME B46.1 standards, ensuring contractual compliance and functional reliability for the client’s assembly process.
Start Your Project

For detailed guidance on achieving the optimal surface finish for your precision machined components, refer to our comprehensive machining surface finish chart. This resource is designed to help engineers and product developers make informed decisions when specifying surface roughness for CNC machined parts.
To request a copy or discuss your specific application requirements, contact Susan Leo at [email protected]. With our advanced manufacturing capabilities and quality control systems, we ensure consistent, repeatable finishes tailored to your functional and aesthetic needs.
Honyo Prototype operates a state-of-the-art CNC machining facility in Shenzhen, China, supporting rapid prototyping and low-volume production with strict adherence to international quality standards.
🚀 Rapid Prototyping Estimator
Estimate rough cost index based on volume.