Contents
Manufacturing Insight: M Code List Cnc

Introduction to M-Code List for CNC Machining at Honyo Prototype
Understanding and correctly implementing M-codes is fundamental to optimizing CNC machining operations, ensuring precise machine tool control, and achieving superior part quality. These auxiliary function commands govern critical actions such as spindle start/stop, coolant flow, pallet changes, and program termination, directly impacting cycle time, tool life, and dimensional accuracy. At Honyo Prototype, we recognize that mastery of M-code functionality is inseparable from advanced CNC manufacturing excellence. Our engineering team leverages deep machine-specific knowledge to configure M-sequences that maximize efficiency and reliability across complex multi-axis operations.
Honyo Prototype delivers end-to-end CNC machining services engineered for prototyping and low-volume production, specializing in precision-machined components for aerospace, medical, and industrial sectors. Our capabilities span 3-axis, 4-axis, and 5-axis milling, turning, and mill-turn operations on premium materials including titanium, Inconel, aluminum alloys, and engineering plastics. Every process is executed to stringent tolerances of ±0.0002 inches, supported by in-house CMM inspection and ISO 9001:2015-certified quality systems. We integrate M-code optimization into our digital thread, ensuring seamless translation from CAD/CAM programming to error-free machine execution—minimizing setup time and eliminating costly rework.
To accelerate your path from design to physical part, Honyo Prototype provides an Online Instant Quote platform. Upload your STEP or IGES files to receive a detailed manufacturability analysis and competitive pricing within hours, not days. This tool reflects our commitment to transparency and speed, allowing engineering teams to rapidly assess feasibility and iterate designs with confidence. Leverage our M-code expertise and streamlined quoting process to transform your CNC machining requirements into high-integrity components, delivered on schedule.
Technical Capabilities

Below are the technical specifications relevant to M-codes used in CNC programming for 3-axis, 4-axis, and 5-axis milling, as well as turning operations. These M-codes support precision machining of tight-tolerance components across common engineering materials including Aluminum (e.g., 6061-T6, 7075), Steel (e.g., 4140, 1018), ABS, and Nylon.
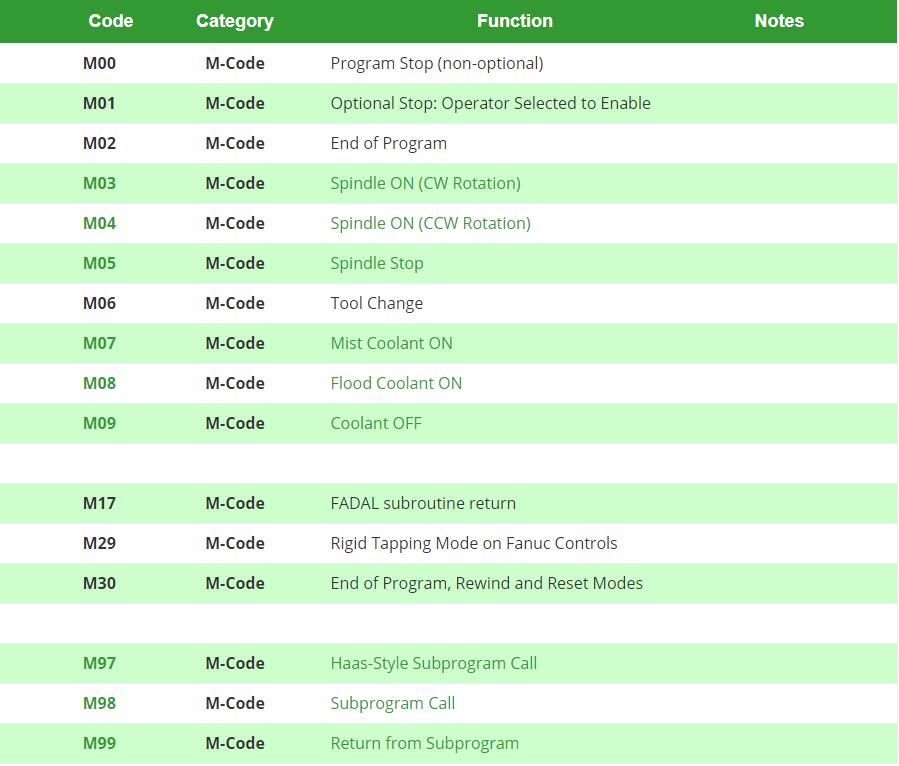
M-codes are auxiliary commands that control machine functions such as coolant, spindle start/stop, tool changes, and program flow. While G-codes define tool motion, M-codes manage machine operations critical for maintaining consistency in high-precision environments.
| M-Code | Function | Relevance to 3/4/5-Axis Milling | Relevance to Turning | Material-Specific Considerations |
|---|---|---|---|---|
| M00 | Program stop | Pauses program for inspection during complex multi-axis sequences; ensures dimensional accuracy under tight tolerances (±0.0002″) | Used for tool inspection or workpiece measurement in high-precision turning of steel or aluminum | Critical when transitioning between operations on thermoplastics like ABS or Nylon to prevent thermal distortion |
| M01 | Optional stop | Allows operator intervention during long 5-axis toolpaths; useful when verifying alignment on deep cavity milling | Applied during setup checks for slender shafts or thin-walled parts | Recommended for ABS and Nylon to verify no deformation due to clamping or heat buildup |
| M03 | Spindle start (clockwise) | Engages spindle prior to tool engagement in milling aluminum or steel at high RPMs; synchronized with S-code for surface finish control | Standard for face turning, grooving, threading; ensures correct cutting direction in hardened steels | Required for consistent chip formation in Nylon to avoid smearing |
| M04 | Spindle start (counterclockwise) | Used for left-hand tapping or specialized milling cutters; less common but necessary in specific 4-axis operations | Used in back-facing or reverse threading operations | Rarely used with non-metallics due to lack of need for reverse cuts |
| M05 | Spindle stop | Ensures spindle halts completely before probing or tool change; essential for repeatability in tight-tolerance work | Stops spindle during part cutoff or post-inspection handling | Prevents residual heat in ABS from affecting subsequent operations |
| M06 | Tool change | Coordinates automatic tool exchange in multi-operation 3–5 axis programs; critical for complex geometries | Enables use of multiple tools (e.g., rough, finish, part-off) in a single setup | Allows material-specific tooling (e.g., sharp, polished inserts for Nylon) without manual intervention |
| M08 | Coolant on (flood) | Maintains thermal stability during extended steel milling; improves tool life and dimensional consistency | Used in continuous cutting of aluminum and steel to manage heat | Generally avoided or minimized with ABS and Nylon to prevent softening or moisture absorption |
| M09 | Coolant off | Disables coolant before tool changes or probing; prevents contamination in clean environments | Turns off before part ejection or final measurement | Essential for plastics to avoid warping due to rapid cooling |
| M19 | Spindle orientation | Aligns spindle for angular tool changes or probing in 4th/5th axis setups; ensures repeatability | Positions spindle for steady rest or collet engagement on long turning blanks | Supports precision fixturing of non-conductive materials where electrical contact probing is used |
| M30 | Program end and reset | Signals end of program; resets control for next cycle; ensures consistency in batch production | Standard end code for finished parts; prepares machine for unloading | Ensures full system reset before next workpiece, especially important in mixed-material runs |
These M-codes are integral to achieving tight tolerances (down to ±0.0005″ routinely, ±0.0002″ with process control) across diverse materials. Machining parameters including spindle speed, feed rate, and coolant usage—triggered via M-code—are optimized based on material properties:
Aluminum: High thermal conductivity requires efficient chip removal; M08 coolant control is critical.
Steel: High hardness demands robust tool engagement; M03/M05 sequencing ensures precise spindle control.
ABS: Low melting point necessitates reduced heat; M08/M09 are carefully managed.
Nylon: Hygroscopic and prone to elastic deformation; M00/M01 stops allow stress relaxation.
Integration of these M-codes into CNC programs enables repeatable, high-accuracy manufacturing across multi-axis platforms and turning centers.
From CAD to Part: The Process

Honyo Prototype’s CNC machining workflow follows a rigorously defined sequence to ensure precision, cost efficiency, and rapid turnaround for custom parts. This process is optimized for technical buyers and engineering teams requiring industrial-grade prototypes or low-volume production. Below is the exact sequence and technical execution for CNC projects:
CAD File Upload and Validation
Clients initiate the process by uploading native CAD files (STEP, IGES, Parasolid, or native SOLIDWORKS/Creo formats) via our secure customer portal. We prioritize native formats to preserve parametric data and avoid geometry translation errors. All files undergo automated validation for unit consistency (mm/inch), model integrity checks, and coordinate system alignment. Non-native formats trigger a pre-DFM geometry audit to identify potential surface gaps or unintended features before quoting.
AI-Powered Quoting with Engineering Oversight
Uploaded geometry feeds into our proprietary AI quoting engine, which analyzes 120+ technical parameters including feature complexity, material removal rate, toolpath accessibility, and fixture requirements. The AI cross-references real-time machine availability, material stock levels, and historical cycle time databases to generate a preliminary quote within 90 minutes. Crucially, this output is never final—it undergoes mandatory review by a dedicated manufacturing engineer who validates AI assumptions against Honyo’s CNC capability matrix (e.g., minimum hole depth-to-diameter ratios, achievable surface finishes per material). Clients receive a technically vetted quote with explicit assumptions documented, not just a price.
Engineering-Driven DFM Analysis
Upon quote acceptance, our DFM team conducts a deep technical review focused on manufacturability within CNC constraints. This is not a checklist but a collaborative engineering dialogue. Key interventions include:
| DFM Focus Area | Typical Findings | Honyo Resolution Pathway |
|---|---|---|
| Geometric Feasibility | Undercuts requiring 5-axis, thin walls <0.8mm | Redesign suggestions or alternative fixturing strategy |
| Tolerance Stack-Up | Over-specified GD&T on non-critical features | Tolerance relaxation proposal with functional impact analysis |
| Material Utilization | Suboptimal stock size leading to 40%+ waste | Revised billet sizing with scrap reduction calculation |
The DFM report includes annotated CAD markups, cost-impact quantification per change, and—if needed—3D-printed fixture prototypes for complex geometries. Client engineers approve revisions via our collaborative portal before production release.
CNC Production Execution
Approved designs move to our climate-controlled machine floor with documented process controls:
Machine Allocation: Parts are assigned to optimal equipment (e.g., 5-axis DMG MORI for multi-sided features, high-speed HMCs for aluminum) based on DFM outputs
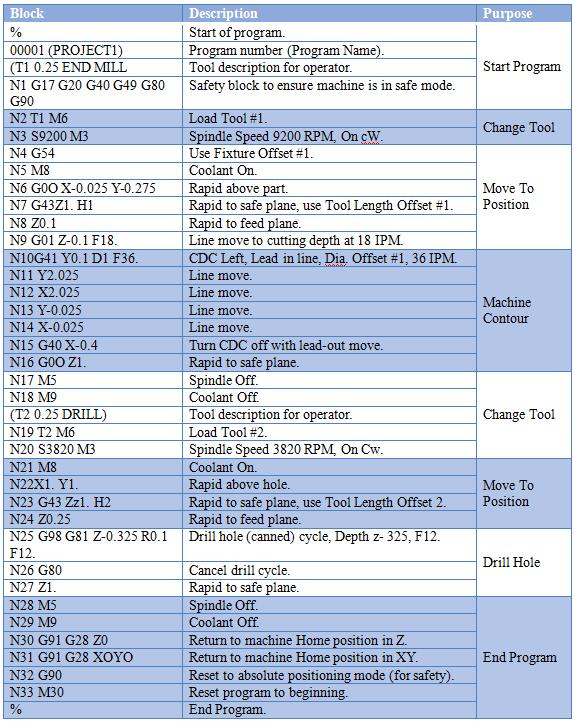
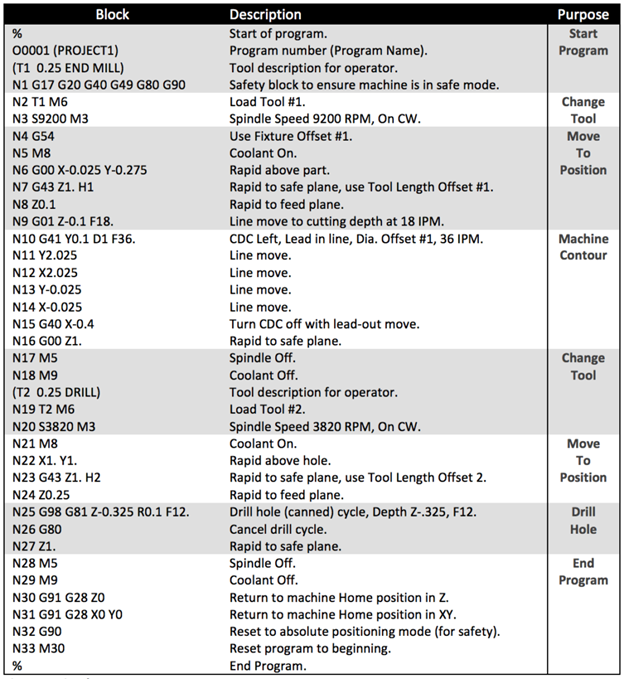
Program Validation: All G-code undergoes Vericut simulation for collision avoidance and material removal verification; M-codes (machine-specific functions like coolant control or pallet changes) are verified against machine PLC logic
In-Process Inspection: First-article inspection uses Renishaw probes for on-machine verification of critical features; batch production includes mid-run CMM checks per AS9102 standards
Material Traceability: Every part ships with melt batch certification and full inspection report (including surface roughness Ra values and dimensional heat maps)
Delivery and Technical Handoff
Finished parts undergo final cleaning (vapor degreasing for aerospace, ultrasonic for medical) and are packaged in anti-static, humidity-controlled containers with custom foam cradling for delicate features. Delivery includes:
Digital package: Coordinate measuring machine (CMM) reports in PDF and DMIS formats, as-built 3D scan data (if requested), and process documentation
Physical package: Parts tagged with unique QR codes linking to real-time production data (tool wear logs, spindle load graphs) via our client portal
Post-delivery engineering support: 72-hour window for technical debrief on part performance or secondary operation recommendations
This closed-loop process eliminates traditional handoff gaps between quoting, engineering, and shop floor execution. By embedding manufacturing expertise at every stage—from AI quote validation through M-code verification—we consistently achieve first-time-right rates above 98.5% for complex CNC projects, with typical lead times of 5–10 business days for milled prototypes. Clients retain full digital thread access for future iterations, ensuring design continuity across prototype to production transitions.
Start Your Project

Explore our comprehensive C code list for CNC machining to optimize your manufacturing processes. For detailed technical specifications and custom programming support, contact Susan Leo at [email protected]. Our precision CNC services are delivered from our ISO-certified factory in Shenzhen, ensuring high accuracy and fast turnaround for your prototyping and production needs.
🚀 Rapid Prototyping Estimator
Estimate rough cost index based on volume.